Use Mastodon on DigitalOcean with Ubuntu
Get started with an overview of the configuration process


This post outlines the process for setting up Mastodon on Digital Ocean using Ubuntu. It provides pointers to other more detailed guides for reference and highlights specific requirements for Digital Ocean. Some of the steps required to complete this installation are found in those guides; I did not want to copy those guides since they are great and also they may change from time to time. This post focused on the bits required that are special to Digital Ocean. The audience is anyone who would like to stand up a small Mastodon server instance quickly on Digital Ocean and does not want to spend time researching all the options.
TL;DR - start with a vetted installation script
At the time of this writing, these two installation scripts are just great, highly recommended to review these scripts. I'm sure there are others out there. I observed many rounds of edits to these scripts and the authors deserve full credit for their work. These scripts may be all you need to spin up a trial or test server. That said, these scripts do not directly speak to some important details on Digital Ocean, such as how to configure a postgreSQL managed cluster and how to configure media storage, so I will cover that below.
https://www.linuxbabe.com/ubuntu/how-to-install-mastodon-on-ubuntu
https://www.howtoforge.com/how-to-install-mastodon-social-network-on-ubuntu-22-04/
Background
Apparently, everyone who runs a Mastodon server must write up the experience. Why would that be? Lots of newbies are checking out Mastodon, and the documentation for installing Mastodon varies quite a bit. It turns out that there are some excellent scripts for installing Mastodon. What I was hoping to find was to find a platform-as-a-service for Mastodon, that allowed me to spin up a development environment and production environment rapidly. Turns out, this does not exist. I am confident that this will exist soon. But for now, there are not many hosting services and those that were operating in 2022 (like masto.host) are either refusing new subscriptions or have very weak support. Digital Ocean has stepped into the void and offered a one-click installation for those who want to kick tires (found here). That works fine for a few minutes but pretty soon you want to know how all the pieces work and not just stare at a black box. Also, perhaps you want to make different choices about the database and media image storage. Perhaps you want the ability to scale up.
Overview of the process using Digital Ocean
Prework
Create Ubuntu Server Droplet
Setup Managed PostgreSQL
Configure PostgreSQL
Setup Postfix
Install Ruby
(optional) Github Configuration
Media Storage Configuration
Download and Configure Mastodon
Setup system services and NGINX
Post-installation steps
Maintenance
Prework
Mastodon is actually a collection of systems and has several moving pieces. You will want to have access to a good password manager to capture the credentials created during the installation. You will also need a Digital Ocean account. They currently have a free trial that makes it inexpensive to experiment. You will also need access to a DNS account that can be used to change the DNS records. And you will need one or two domains available for use. It is not easy to rename the server once you have installed it, so pick the domains with that in mind.
For context, I found it necessary to track the following credentials:
DNS provider password
SendInblue account password
SMTP username
SMTP password
Digital Ocean account password
SSH keys
PostgreSQL account password
PostgreSQL private hostname
PostgreSQL port
API access key for digital ocean spaces bucket
API secret key for digital ocean spaces bucket
access to ubuntu root console
Mastodon service account password
test account passwords
email account passwords for testing Postfix integration
Create Ubuntu Server Droplet
For Mastodon itself, you will need a separate virtual machine. From the project in DigitalOcean, use the big green Create button to create a Droplet in your region (e.g. SFO3) with Ubuntu 22.04 (LTS), 2 Gb RAM, 2 CPU, 60 Gb SSD, 3 TB transfer or larger.

Add metrics and enable backups if you plan to go live. You can play with the CPU, RAM, and SSD sizing options but the specification above is an example of a minimal sizing that seems to handle a basic mastodon server.
Consider a adding reserved IP address, this will allow you to swap in another server without updating the DNS and disrupting your users due to slow DNS propagation across the internet. You can do this with a click from the console. You can do it later but you will want to put that reserved IP address into your DNS configuration. Once you have added that to DNS, then you could swap server Droplets without updating DNS, which is faster as DNS requires time to propagate.
Notice that this minimum-size Droplet comes with only 22 database connections which may or may not be enough for your intended purpose. Unfortunately, Mastodon uses a ridiculous number of connections. We can partially mitigate that by using connection pools (described below.)
Recapping the steps:
1.1 - Create the Ubuntu Droplet and when that completes, click to open the Droplet control panel.
1.2 - Assign a reserved IP address to the droplet.
1.3 - If this is your first time only, copy the reserved IP address, and using your DNS service account, update the A record in the domain record to point to the reserved IP address.
1.4 - Using the Access link to the left, click 'Launch Droplet Console' to bring up a shell.
1.5 - You will need a mailer to handle password resets and notifications. A really good guide for using a postfix mailer with SendInBlue can be found here.
1.6 - Reminder - did you enable backups?
Setup Managed PostgreSQL
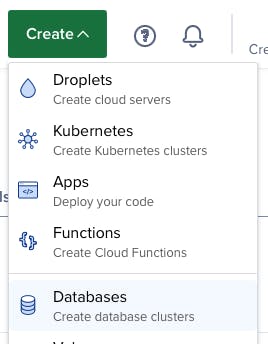
2.1 In the project, click 'Databases' to create a database cluster.
2.2. Choose a data center region. The data center region should be the same as the Ubuntu Droplet, e.g. SFO3 - this is important because these two systems need to be in the same virtual private cloud (VPC). This is necessary due to security and performance considerations.
2.3 Choose a database engine: PostgreSQL.
2.4 Choose a plan. Starter plan is fine. But notice the connection limits - this is a key part of their pricing. To get more connections you need to set up a connection pool, and in the future increase the size of the cluster.
2.5 Click the ‘Create Database Cluster’ button and wait for it to provision.
2.6 Under Trusted Sources, you can secure the database by restricting access. Add trusted sources for your local computer and the Ubuntu Droplet provisioned in step 1.
2.7 Change the upgrade window so scheduled downtime happens at the right time.
2.8 Observe the connection details. Note that we must create a new database; we should not use the default database.
2.9 If you have not already, finish going through the setup wizard and go to the ‘users and databases’ tab.
2.10 Add user name mastodon and click ‘Save’.
2.11 Add database mastodondb and click ‘Save’.
Configure PostgreSQL
Existing guides describe how to install PostgreSQL, so I will not repeat that. But they are missing a step for Digital Ocean.
First, use the procedure in the following guides to install PostgreSQL locally on Ubuntu. The basic process is documented here with more help over here, and here. If you are not using a database cluster, the guide by Xiao Guoan (LinuxBabe) is all you need.
Second, we will add a database to make the installer happy.
3.1 Launch the console for the Ubuntu droplet that you set up.
3.2 Follow the script above to install PostgreSQL on the Ubuntu Droplet. Since we are using the Postgres cluster, we are installing PostgreSQL on the Droplet so that we can access the remote database cluster, and we need the psql program installed locally.
After using the script, one extra step is required for the cluster configuration.
3.3 go to the database cluster overview page
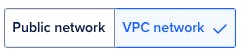
3.4 in Connection Details on the left, click ‘VPC network’
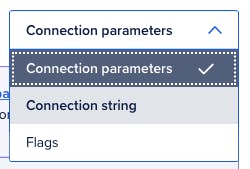
3.5 in Connection Details on the right, click ‘connection parameters’ and then select ‘connection string’. We will copy the connection string in a second.
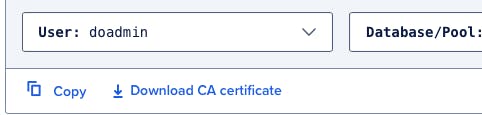
3.6 Select the user ‘doadmin’ and database ‘defaultdb’

3.7 Press the Copy button to copy the connection string
3.8 Switch over to the Ubuntu droplet console and type “psql ‘“ - note the space followed by a single quote
3.9 Paste in the connection string, add another single quote at the end, and then press the Enter key. Make sure the password is good. If it worked then you should see this prompt:
defaultdb=>
3.10 Add the Postgres database as follows:
doadmin> CREATE DATABASE postgres;
doadmin> \list
Without this, the mastodon installation script will fail. You could also create this database using the Digital Ocean database console.
3.11 Update the password for user ‘mastodon’ as follows
doadmin> ALTER USER mastodon WITH ENCRYPTED PASSWORD 'your_preferred_password';
doadmin> \q
An alternative is to do this from the control panel, but then the password will be given to the host. Make sure your password does not have special characters that might cause the console shell to have problems. I always automatically generate passwords, but this resulted in a password with an embedded ampersand; that did not go well.
In the console, in the row of the username is a menu with three dots “...”. Click that and you can reset the password. This mastodon database user password will be needed later, so save it somewhere.
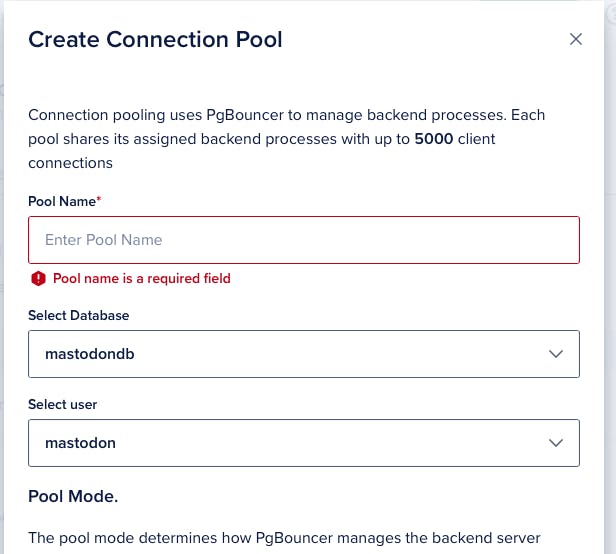
Connection Pools
I recommend creating a connection pool, but to do this, the mastodon database must first be visible in the Digital Ocean PostgreSQL console. I found I had to wait a little bit of time before adding this. It's very easy to add, and this step can be done at the end of the process.
4.1 In the Digital Ocean database dashboard select the 'Connection Pools' tab, and then click 'Create a connection pool'
4.2 Add the pool name.
4.3 Set the database to the mastodon database
4.4 Set the user to the mastodon user.
4.4 Set the pool size. The size of the connection pool should be one half of the maximum connections. So if you have the default 22 connections, the pool size should be 11.
4.5 Click 'Create Pool'
Setup Postfix
It is necessary to setup a mailer that can process password reset email messages and notifications. To get started, the easiest way is to follow this guide:
Be sure to add the SENDINBLUE smtp entries into DNS. More than one mastodon server can share the same postfix configuration. This is helpful, for example, to allow a development Mastodon droplet share the same email configuration as a production instance.
Install Ruby
$ sudo apt install ruby ruby-dev
$ ruby -v
Github Configuration
You have an optional choice between cloning the Mastodon repository using the original public sources, or forking that into a repository somewhere else like Github. If you plan to modify the source, forking the repo is the way. What I like about using Github is that you can easily see and drilldown into the most recent changes that have been made since you forked the repo, and you can also easily synchronize those changes back into your repo. Also, if you plan to modify the source code, you will eventually need a public repository somewhere due to the AGPL license for Mastodon.
Media Storage Configuration
Some Mastodon installation guides describe how to use AWS. The most straightforward approach in my humble opinion is to use DigitalOcean Spaces. The mastodon install script prompts for details about your media storage implementation.
Creating a space is very easy. I found myself creating two Digital Ocean spaces: one for a development droplet and one for production. From the project, you can use the big green button again to create spaces:

Once you have created a space, you have to create access keys for the space. There is a link that appears on the left from the list of spaces:
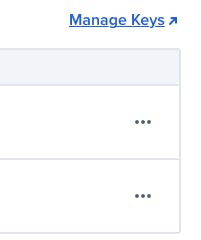
Click 'Manage Keys' to create a key. The system will create both an access key and a secret key. You have to write down the secret key somewhere. If you forget the secret you can easily use 'Generate New Key' to update the secret. The mastodon installation script below will prompt you for this key, which becomes AWS_SECRET_ACCESS_KEY in the environment file.
Once you have a media bucket (space) created with an access key and a secret key, you are ready to install Mastodon.
Note: After I ran the mastodon installation script (in the next section) , everything seemed to work until a day later and then the images on posts had broken links. I had to manually add the entry below for S3_ALIAS_HOST into .env.production in /var/www/mastodon, which establishes the correct URL route for links to media such as images.
S3_ENABLED=true
S3_PROTOCOL=https
S3_BUCKET=your_bucket_name
S3_REGION=sfo3
S3_HOSTNAME=your_bucket_name.sfo3.digitaloceanspaces.com S3_ENDPOINT=https://sfo3.digitaloceanspaces.com S3_ALIAS_HOST=your_bucket_name.sfo3.digitaloceanspaces.com
Download and configure Mastodon
Before you install Mastodon itself, consider taking a snapshot in DigitalOcean of the Ubuntu droplet. One must power down the droplet before taking a snapshot, and then power it back up afterward. By doing this now, you will have the ability to re-run the installation procedure easily and discard results if you have a typo along the way. I found myself making typos a few times, so having a snapshot saved time.
The basic Masoton installation procedure is not special to DigitalOcean and can be found in this script.
As you install, you will be prompted for bits of information that come from the Digital Ocean configuration. The details for your database and for media storage need to come out of Digital Ocean. Pay attention to the example below - you will need to provide these values to the installation script.
After the installation, the environment variables stored in /var/www/mastodon/.env.production should look like this:
DB_HOST=get_the_host_from_digital_ocean
DB_PORT=get_the_port_from_digital_ocean
DB_NAME=mastodondb
DB_USER=mastodon
DB_PASS=your_mastodon_database_password
S3_BUCKET=your_spaces_bucket_name
S3_REGION=sfo3
S3_HOSTNAME=your_spaces_bucket_name.sfo3.digitaloceanspaces.com S3_ENDPOINT=https://sfo3.digitaloceanspaces.com
Setup System Services and NGINX
Before we can use Mastodon, we need to configure system services and install NGINX. The basic procedure is not special to DigitalOcean and can be found in this script.
The script had a missing step. After you follow the script, go back and edit the NGINX configuration file. Replace the example.com with your domain i.e. example.social. Test it again, then restart nginx - otherwise you are not using a valid certificate.
Once this step is finished, you should be able to view and log in to your Mastodon instance.
Post-installation Considerations
Be sure to follow any post-installation steps in the installation script. Be sure to test your installation by logging in, manually creating a Mastodon account, uploading an image or two, save a post, and reset the password on that account. This helps to confirm that the media storage, database, and email settings are all good.
- Add accounts
You may find that you want several accounts in place on your instance. You can use scripts to create accounts. When you do this, be prepared to copy out the password that is returned for the accounts, or you will need to reset the passwords later. To add a user via the command line:$ cd /var/www/mastodon$ sudo -u mastodon RAILS_ENV=production bin/tootctl accounts create your_account_name --email your_email@your_domain --confirmed
The system will return a password for that account, save it somewhere.
- Reserve accounts.
I also discovered that you can reserve certain accounts, to prevent users from signing up and creating accounts. In Mastodon, it is not possible to rename accounts, so reserving accounts can avoid headaches later. To implement, edit the reserved_usernames entry in settings.yml as follows:
$ cd /var/www/mastodon/config$ nano settings.yml
The format of settings.yml looks like this:reserved_usernames: - admin - support - help - root
Maintenance
Development and Production Environments
In Digital Ocean it is straightforward to create one Droplet for development and a second Droplet for production. This is helpful to allow testing changes and testing release updates on a development systems before you apply the changes to production. This is approach highly recommended if you will be going to production with your Mastodon instance.
Customizing Mastodon CSS
You may wish to customize the theme. You can edit the css via the admin interface : Preferences > Administration > Server Settings > Appearance. After you change the CSS you must restart the application web server to see the CSS. You may also need to restart NGINX.
$ cd /var/www/mastodon
$ systemctl reload mastodon-web
There are not many guides to customizing CSS. I was able to find this example by BattlePenguin and then adapt it by changing the colors. It is a bit tricky and I had to use the browser developer tools to Inspect pages and CSS elements a few times. But I can confirm that many changes are possible without the need to modify the Mastodon source code by formally adding a theme.
Final Thoughts
I first wrote these procedures down so I could repeat the setup process quickly. I hope I've captured everything accurately here, but feedback is welcome!